Exercise Intermediate, part 1: Chat application - Establish connection
Request:
Create a chat application using Java programming language and the MySQL database.
Solution
Before starting this lesson you need to follow this lesson Online MySQL database lesson to have an online MySQL database if you don't own one already.
After ensuring an online MySQL database, in order to be able to communicate to a database we need a driver. In this case we will use a JDBC driver from MySQL that we will download from the website of mysql.com which is a free driver with a GPL certificate. This driver can be downloaded at href="http://dev.mysql.com/downloads/connector/j/. In this page, which in the time of this tutorial is as shown in the figure 1, we select to download the zip file through the download button as marked in the same figure.
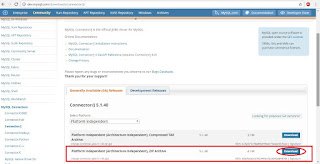
Figure 1: MySQL JDBC driver download page
After you click on the download button you should see a page similar to the one shown in the figure 2 where you should find the link shown in the same figure if you scroll down a little.

Figure 2: "No thanks, just start my download." link
After you click on "No thanks, just start my download." link the download process must start. After your download has completed extract the content of the zip file. After we extract the zip file we should get a folder with the files shown in the figure 3, among which is the jar file marked in the figure 3 which is the library which we will use in our application.

Figure 3: JDBC driver
Now that we have the JDBC driver is time to open the NetBeans IDE and create a new project, I will call this project Chat. After creating the project we need to right click on the Libraries folder under the Project explorer on the right panel of IDE and select Add JAR/Folder... menu as shown in the figure 4 bellow.

Figure 4: Add JAR/Folder... menu
After we click the Add JAR/Folder... menu we should get a window which allows us to browse the folder in our system in order to find our JAR library. In my case I extracted the zip file in desktop, so I have to go to desktop in that window and go into the directory that I extracted from the zip file and than select the JAR library as shown in the figure 5.

Figure 5: Select JAR library from the extracted folder
After completing the above action you should have under the Libraries folder the JAR file as shown in the figure 6.

Figure 6: JAR library under the Libraries folder
Now we are ready to start programming. Being that we have learned classes at lesson 1 intermediate we will start using some concepts of object oriented.
We need to create a class where we will handle the database interaction, this class we will call DatabaseInteraction. In order to create the new class we need to right click on our package, which in the case of this lesson is chat, than select New than click on Java Class... as shown in the figure 7.

Figure 7: Add new class
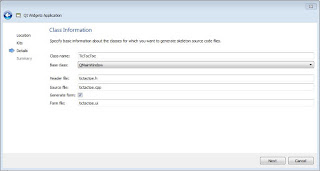
In the window that shows next we determine the name of the new class, which in our case is DatabaseInteraction and than click Finish as shown in the figure 8.

Figure 8: Determine the name of new class
In the new class we will need to create a connection with the database. In order to be able to establish a connection with our MySQL server we need to know the name of the server where our MySQL database is hosted, the port where we can connect with the database, the name of the database, the username and password that we used to login at the phpMyAdmin during the Online MySQL database lesson. As you can see from the confirmation email after the creation of the account at the db4free.net shown in the figure 4 of Online MySQL database lesson the host name is db4free.net and from the same email we can see that the port is 3306 which is the default port for the MySQL databases so we will not put it in our connection string. So with the information that we have the connections string should be the following:
Example code:
Remember to replace the value of databaseName, username and password variables with the values that you have assigned to your database when you have created your account at db4free.net during the Online MySQL database lesson.
Being that we will use only one database during this example we will put this values hard coded in our DatabaseInteraction class as shown in the igure 9.
In order to connect to the MySQL database we need to import some classes from the sql package of java libraries. This import will be as shown bellow.

Figure 9: Connection string and import classes from sql package
After we added the rows shown in the figure 9 in the DatabaseInteraction class we continue by adding a variable connection of type Connection that we imported from the sql package and the constructor. The constructor is the first element that is called when a new instance(object) is created. In the constructor we will create the connection with our database. In the constructor we will add the line shown in the figure 10.

Figure 10: Constructor and call of getConnection method of DriverManager class
So in order to establish the connection with our database we call the getConnection method of DriverManager class and pass as parameter to the getConnection method our connection string. getConnection is a special method which implements a pattern called singleton pattern. This pattern makes sure that we have only one instance of DriverManager class in our case, so we have only one active connection with database. As we can see in the figure 10 above, we have an error on line 17 because the getConnection method throws an exception and we need to manage this exception when we call this method or the method or constructor in our case where the getConnection method is called must throw an exception which is our case shown in the figure 11 because we need to handle this exception in the class where are managed the graphical elements which we will create later on.

Figure 11: Throw exception or constructor
Now that we have written the code established the connection let's test it. We will create an instance of the DatabaseInteraction class, which means we will call the constructor of DatabaseInteraction class where we have written the code which connects us with the database.
We will change the content of Chat class as shown in the figure 12 in order to test if we can connect to the MySQL database or not.

Figure 12: Create instance of DatabaseInteraction
As we can see from the figure 12 we have surrounded the call toward the constructor of DatabaseInteraction class with try catch because as explained before this constructor throws a SQLException which we handle here when we call it. We call the constructor of the DatabaseInteraction class through the new keyword as shown in the figure above.
After we run the main method of Chat class we get the output shown in the figure 13 in case the data we entered in the variables that we used in our connection string are ok. The first line shown in the Output window is a warning which we can ignore for the moment and the second lines shows that the line bellow the call of constructor is executed, which means that when we crated the instance of DatabaseInteraction its constructor did not through the exception which would interrupt the execution of the code within the try block and would start to execute the code within the catch block

Figure 13: Connection OK
In case the data in connection string would have been wrong we would have printed on the Output window the message "Error " followed by the message of error returned by the JDBC driver as shown in figure 14.

Figure 14: Connection not established
This is all for the first part, we will continue this exercise in part two.
(please report broken link in the comment)
Create a chat application using Java programming language and the MySQL database.
Solution
Before starting this lesson you need to follow this lesson Online MySQL database lesson to have an online MySQL database if you don't own one already.
After ensuring an online MySQL database, in order to be able to communicate to a database we need a driver. In this case we will use a JDBC driver from MySQL that we will download from the website of mysql.com which is a free driver with a GPL certificate. This driver can be downloaded at href="http://dev.mysql.com/downloads/connector/j/. In this page, which in the time of this tutorial is as shown in the figure 1, we select to download the zip file through the download button as marked in the same figure.

Figure 1: MySQL JDBC driver download page
After you click on the download button you should see a page similar to the one shown in the figure 2 where you should find the link shown in the same figure if you scroll down a little.

Figure 2: "No thanks, just start my download." link
After you click on "No thanks, just start my download." link the download process must start. After your download has completed extract the content of the zip file. After we extract the zip file we should get a folder with the files shown in the figure 3, among which is the jar file marked in the figure 3 which is the library which we will use in our application.

Figure 3: JDBC driver
Now that we have the JDBC driver is time to open the NetBeans IDE and create a new project, I will call this project Chat. After creating the project we need to right click on the Libraries folder under the Project explorer on the right panel of IDE and select Add JAR/Folder... menu as shown in the figure 4 bellow.

Figure 4: Add JAR/Folder... menu
After we click the Add JAR/Folder... menu we should get a window which allows us to browse the folder in our system in order to find our JAR library. In my case I extracted the zip file in desktop, so I have to go to desktop in that window and go into the directory that I extracted from the zip file and than select the JAR library as shown in the figure 5.

Figure 5: Select JAR library from the extracted folder
After completing the above action you should have under the Libraries folder the JAR file as shown in the figure 6.

Figure 6: JAR library under the Libraries folder
Now we are ready to start programming. Being that we have learned classes at lesson 1 intermediate we will start using some concepts of object oriented.
We need to create a class where we will handle the database interaction, this class we will call DatabaseInteraction. In order to create the new class we need to right click on our package, which in the case of this lesson is chat, than select New than click on Java Class... as shown in the figure 7.

Figure 7: Add new class
In the window that shows next we determine the name of the new class, which in our case is DatabaseInteraction and than click Finish as shown in the figure 8.

Figure 8: Determine the name of new class
In the new class we will need to create a connection with the database. In order to be able to establish a connection with our MySQL server we need to know the name of the server where our MySQL database is hosted, the port where we can connect with the database, the name of the database, the username and password that we used to login at the phpMyAdmin during the Online MySQL database lesson. As you can see from the confirmation email after the creation of the account at the db4free.net shown in the figure 4 of Online MySQL database lesson the host name is db4free.net and from the same email we can see that the port is 3306 which is the default port for the MySQL databases so we will not put it in our connection string. So with the information that we have the connections string should be the following:
Example code:
Remember to replace the value of databaseName, username and password variables with the values that you have assigned to your database when you have created your account at db4free.net during the Online MySQL database lesson.
Being that we will use only one database during this example we will put this values hard coded in our DatabaseInteraction class as shown in the igure 9.
In order to connect to the MySQL database we need to import some classes from the sql package of java libraries. This import will be as shown bellow.

Figure 9: Connection string and import classes from sql package
After we added the rows shown in the figure 9 in the DatabaseInteraction class we continue by adding a variable connection of type Connection that we imported from the sql package and the constructor. The constructor is the first element that is called when a new instance(object) is created. In the constructor we will create the connection with our database. In the constructor we will add the line shown in the figure 10.

Figure 10: Constructor and call of getConnection method of DriverManager class
So in order to establish the connection with our database we call the getConnection method of DriverManager class and pass as parameter to the getConnection method our connection string. getConnection is a special method which implements a pattern called singleton pattern. This pattern makes sure that we have only one instance of DriverManager class in our case, so we have only one active connection with database. As we can see in the figure 10 above, we have an error on line 17 because the getConnection method throws an exception and we need to manage this exception when we call this method or the method or constructor in our case where the getConnection method is called must throw an exception which is our case shown in the figure 11 because we need to handle this exception in the class where are managed the graphical elements which we will create later on.

Figure 11: Throw exception or constructor
Now that we have written the code established the connection let's test it. We will create an instance of the DatabaseInteraction class, which means we will call the constructor of DatabaseInteraction class where we have written the code which connects us with the database.
We will change the content of Chat class as shown in the figure 12 in order to test if we can connect to the MySQL database or not.

Figure 12: Create instance of DatabaseInteraction
As we can see from the figure 12 we have surrounded the call toward the constructor of DatabaseInteraction class with try catch because as explained before this constructor throws a SQLException which we handle here when we call it. We call the constructor of the DatabaseInteraction class through the new keyword as shown in the figure above.
After we run the main method of Chat class we get the output shown in the figure 13 in case the data we entered in the variables that we used in our connection string are ok. The first line shown in the Output window is a warning which we can ignore for the moment and the second lines shows that the line bellow the call of constructor is executed, which means that when we crated the instance of DatabaseInteraction its constructor did not through the exception which would interrupt the execution of the code within the try block and would start to execute the code within the catch block

Figure 13: Connection OK
In case the data in connection string would have been wrong we would have printed on the Output window the message "Error " followed by the message of error returned by the JDBC driver as shown in figure 14.

Figure 14: Connection not established
This is all for the first part, we will continue this exercise in part two.
(please report broken link in the comment)


Comments
Post a Comment